


Introduction
You finish a midnight feed, rinse the bottle, and by the next morning, it still smells sour. Then you scrub harder, change soap, and rewash, but a cloudy film keeps coming back. That loop is exhausting, and for new parents and NICU parents, it can also feel high-stakes because you do not want to guess when it comes to baby care.
This guide explains what causes baby bottle smell and residue, how to tell film from mineral scale, and where most cleaning workflows fail (it is usually disassembly or drying). You will learn a practical hygiene ladder (clean, sanitize, sterilize), then walk through five modules that help you diagnose, wash, sanitize, dry, and store feeding gear with fewer rewashes. Along the way, you will see how an all-in-one Baby Bottle Washer and Baby Bottle Cleaner workflow can remove odor at the source.
Baby Bottle Washer Fundamentals for Smell and Residue
Why do bottles smell even when they look clean?
Bottle odor usually comes from what you cannot see, not what you can. Milk and formula contain fats and proteins that cling to surfaces, especially in tight geometries like nipple threads, anti-colic vents, valve membranes, and wearable pump seals. If that residue stays damp, it becomes a perfect place for microbes to grow and for fats to oxidize, which your nose reads as sour.
A key idea for new parents is that smell is often a workflow problem, not a soap problem. If you do not fully disassemble parts, the spray and detergent cannot reach the trapped film. If you do not dry fully, leftover moisture keeps odor cycling back even after a good wash.
The main residue types you are seeing
Not all residue is the same, so the fix is not always more scrubbing. Most families run into one of these:
- Milk film: slightly greasy or slippery feel, often clear until it builds up
- Protein haze: looks cloudy, especially after heating or warming
- Mineral scale: chalky white spots or cloudy patches from hard water
- Detergent carryover: slick feel or perfumed smell, usually from overdosing
A Baby Bottle Cleaner process should match the residue type. Film needs better mechanical coverage (spray, agitation) and correct dosing. Scale needs periodic descaling and water-quality control.
The hygiene ladder: clean vs sanitize vs sterilize
Parents often use these terms interchangeably, but they solve different problems.
- Clean: removes milk residue and visible soil using detergent and mechanical action.
- Sanitize: reduces germs to safer levels using heat or chemicals after cleaning.
- Sterilize: aims for a higher margin of germ reduction, typically via steam sterilizer cycles.
For many households, consistent cleaning plus complete drying is what stops smells. For higher-risk situations (premature babies, immunocompromised infants), adding a sanitize or steam sterilizer step more often can be helpful. The CDC notes that every few days (or at least daily for babies under 2 months, premature, or with a weakened immune system) you should wash, sanitize, and allow items to dry thoroughly to reduce contamination.
Drying and storage are not optional
If you solve washing but ignore drying, odor returns fast. Moisture trapped in silicone parts, bottle collars, and pump membranes can keep residue soft and keep bacteria multiplying. Drying also protects against detergent carryover because water left in parts concentrates whatever was dissolved in that rinse water.
The most practical rule is simple: if you would not store a clean dish wet in a closed cabinet, do not store baby feeding gear wet either.
Baby Bottle Washer Module 1: Diagnose the Smell and Residue

Smell diagnosis is fastest when you stop asking, "Does it smell?" and start asking, "When does it start smelling?" If the odor is present immediately after washing, you likely have a cleaning coverage problem: missed crevices, too-cool water, under-dosing detergent, or parts not fully separated. If the odor appears after storage, you almost always have a drying and moisture-trap problem.
Next, identify what the residue looks and feels like. A greasy slip points to milk fats, while a chalky, matte film points to mineral scale (hard water). A perfumed or soapy smell plus a slick feel often means detergent carryover, especially if you are using too much.
Use this quick decision split before you change products or buy more accessories:
- Smell right after wash: disassembly or spray coverage gap
- Smell after sitting 6-24 hours: drying gap or damp storage
- Cloudy white spots: hard water scale, needs descaling
- Soapy feel: detergent dose too high
For NICU parents building a low-guesswork routine, this module matters because it prevents random changes. You want one controlled variable at a time: how you take it apart, how it washes, and how it dries.
Baby Bottle Washer Module 2: Build a Zero-Residue Cleaning Workflow
A zero-residue workflow is mostly about repeatability. You should be able to run the same steps at 2 a.m. and 2 p.m. without thinking, even when you are exhausted.
Start with full disassembly. Remove nipples, collars, anti-colic inserts, straw pieces, pump valves, duckbills, backflow protectors, and wearable pump membranes if your system allows it. The goal is to eliminate any sealed pocket where milk can pool. Then do a quick pre-rinse right after feeding so residue does not dry into a stubborn film.
To reduce rewashes, keep your core cleaning variables stable:
- Water temperature: warm to hot, but within safe limits
- Detergent dose: correct amount, not "extra for safety"
- Placement: do not nest parts or block spray paths
- Crevice priority: nipples, vents, valves, and threads
A practical tip for first-time parents: if you are using a dedicated Baby Bottle Washer, treat loading like you would treat a lab rack. Spacing matters. When parts touch, water cannot shear off film, and you end up with the same smell that triggered this guide.
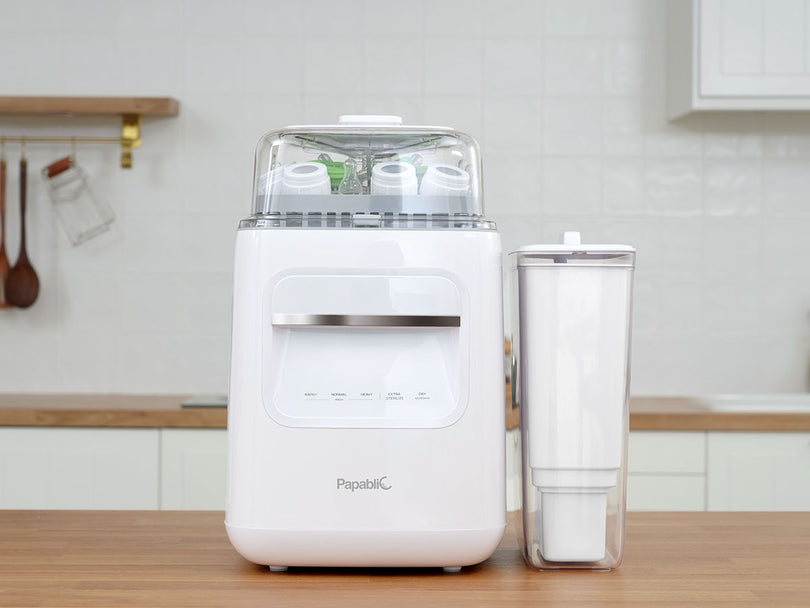
In the Papablic ecosystem, the SafeguardPlus washer positions itself as a 5-in-1 Baby Bottle Cleaning System with an upgraded capacity designed around bottles plus wearable pumps, with 360-degree deep-clean coverage and stronger drying to reduce leftover moisture. It also highlights built-in PurifyClean water purification and a 72-hour hygienic storage mode, which is relevant if your smell issue is tied to water quality or damp storage rather than scrubbing technique.
Shop: Papablic SafeguardPlus™ Baby Bottle Washer System
Baby Bottle Washer Module 3: Sanitize and Sterilize When Risk Is Higher
A Baby Bottle Washer removes residue first, then heat-based cycles can reduce germs further. That order matters because sanitizing a dirty surface does not work the way most people think; residue can shield microbes.
If you want a clear definition for a "sanitizing cycle" in the home, NSF has a useful benchmark. NSF/ANSI 184 certification for residential dishwasher sanitization is designed to confirm a minimum 99.999% (5-log) reduction of bacteria when operated on the sanitizing cycle. That definition is summarized by NSF.
For NICU parents and households with higher-risk infants, the decision is not "sanitize forever" versus "never sanitize." A better mindset is "add margin during high-risk windows." Those windows commonly include the first months, times of illness, or when you cannot guarantee fast washing after feeds.
If you use a steam sterilizer step, treat it as an extra safety layer after cleaning. Steam sterilizer cycles can be especially useful for silicone-heavy systems (nipples, valves) where odor problems and moisture traps overlap. The important part is to finish with full drying, because warm, enclosed gear that stays damp can re-develop odor quickly.
Baby Bottle Washer Module 4: Dry Fully to Prevent Odor Return

If your bottles smell fine after washing but smell bad after storage, you do not need a new detergent. You need a better drying outcome. Drying is not just about convenience; it is moisture control. When parts stay wet, you keep a thin water layer where residue dissolves, re-deposits, and feeds odor.
Focus on the parts that trap water:
- Silicone nipples (base folds and flange)
- Anti-colic vents and tiny channels
- Pump valves, duckbills, and membranes
- Bottle rings and thread grooves
The CDC explicitly calls out thorough drying and notes that sanitizing and drying at least daily may be appropriate for premature babies and other higher-risk infants. That guidance is practical: even a strong wash can fail the next day if you put damp parts into a closed bin.
If you use a fast-drying Baby Bottle Sterilizer or a hygienic bottle dryer, your aim is consistent, repeatable dryness. The easiest check is tactile: if silicone still feels cool and slightly "tacky" from moisture, it is not done.
In Papablic's current positioning for SafeguardPlus, the "twice the drying power" claim and the 72-hour hygienic storage concept both map directly to odor prevention, because dry storage breaks the smell cycle that starts when moisture lingers.
Shop: Papablic SafeguardPlus™ Baby Bottle Washer System
Baby Bottle Washer Selection and Decision Guide
Choosing a Baby Bottle Washer is easier when you decide on your workflow first. Start with the constraints in your home: number of daily bottles, pump-part complexity, water quality, and how often you need an all-in-one result (wash + Baby Bottle Sanitizer + fast drying).
Capacity and geometry fit
Capacity is not just "how many bottles." It is whether the rack geometry fits your real life:
- Bottles per day: 6-12 for many new parents
- Pump parts: flanges, valves, membranes
- Wearables: multiple small silicone pieces
- Toddler products: sippy cups, straws
If your washer cannot keep parts separated, you will block the spray and re-create residue.
Cycle options that match real risk
You want modes that match your household rather than one "mega cycle" you will not run.
- Wash-only: quick reset between feeds
- Wash + sanitize: higher-risk windows
- Dry-only: finishing damp silicone
- Storage mode: reduce recontamination
Consumables and maintenance
Every system has upkeep. What matters is whether it is predictable and easy.
| Decision factor | What to check | Why it matters |
|---|---|---|
| Filters | Replacement interval | Prevents residue, protects drying |
| Detergent tablets | Dose and dissolving | Avoids detergent film |
| Descaling | Tablet or liquid plan | Controls hard-water scale |
| Cleaning reminders | On-screen prompts | Reduces "forgotten" upkeep |
As one concrete example, Papablic states its filter replacement reminder is based on about every 30 wash cycles, which is the kind of predictable interval that helps busy families stick to a routine.
Common pitfalls to avoid
Most smell and residue problems come from one of these predictable mistakes.
- Soaking in a dirty sink: It turns residue into a film and adds new germs.
- Stacking parts that block jets: Contact points create unwashed shadows.
- Sealing damp parts: Moisture plus darkness is the odor recipe.
- Ignoring hard-water scale: It looks harmless, but holds odor and film.
- Overcorrecting with fragrance: Scented soap can mask problems and linger.
If you are building an all-in-one feeding solutions station (washer, steam sterilizer, bottle warmers, and a Breast Milk Cooler), treat it like a small production line: dirty in one direction, clean out the other, and no crossover.
Conclusion
A bottle washer can help with baby bottle smell and residue, but it works best when you pair it with the two steps most people skip: full disassembly and complete drying. In practice, odor control is not a single feature. It is a workflow that reliably removes residue, reduces germs when risk is higher, and keeps parts dry during storage.
Start by diagnosing whether your issue is washing coverage or drying and storage. Then choose a Baby Bottle Washer and Baby Bottle Cleaner routine that matches your daily bottle volume, pump parts, and water quality. When your process is stable, the smell usually disappears without the rewash loop.
FAQ
What usually causes a baby bottle smell after cleaning?
Most baby bottle smells after cleaning come from milk residue trapped in small crevices or moisture that stays behind after the wash. Nipples, anti-colic vents, and pump valves are the top offenders because they create sealed pockets. If the odor shows up only after storage, you are almost always dealing with incomplete drying or damp storage. If the odor is present immediately after washing, you likely missed disassembly or blocked spray coverage. Fixing disassembly plus drying usually solves it within 1 to 3 cycles.
Is a bottle washer the same as a baby bottle sterilizer?
A bottle washer is designed to remove residue using spray action and detergent, while a baby bottle sterilizer focuses on germ reduction, commonly with steam or heat. You can have a perfectly sterilized item that still smells if milk film remains, because sterilization does not remove fats and proteins. Conversely, a well-cleaned bottle can still be higher-risk if it is not sanitized during certain infant health windows. Many modern systems combine washing, sterilizing, and drying, so you get residue removal plus a safety margin. When you compare options, check whether the unit can both wash effectively and dry thoroughly.
When should new parents sanitize or sterilize feeding items?
New parents often add sanitizing or sterilizing more frequently during the first months or during times when an infant is medically vulnerable. Premature infants, babies under about 2 months, and immunocompromised babies generally justify a more conservative routine because the consequences of contamination are higher. For full-term healthy babies, consistent cleaning and complete drying are often the biggest lever for odor control and routine safety. The practical approach is to increase sanitizing or steam sterilizing when risk is higher, then relax when your pediatric guidance and baby's health allow. Whatever routine you choose, do not skip drying, because damp parts can undo the benefit.
Can detergent residue cause a film or smell?
Yes, detergent residue can leave a film that holds odor and sometimes creates a soapy or perfumed smell on silicone and plastic. The most common cause is overdosing on detergent tablets or liquid, especially in small countertop systems with limited rinse volume. Another cause is overloading the rack so that rinse water cannot flush away dissolved detergent. If parts feel slick after drying, cut the dose and improve spacing so rinse water reaches every surface. You can also run an extra rinse or a dry-only cycle after adjusting the dose.
Does hard water make residue worse?
Hard water can make residue worse because minerals can deposit as a cloudy or chalky scale that traps milk film and odor. Scale often shows up as white spots on bottle walls, rings, or heating surfaces, and it can make silicone feel less smooth over time. If you see recurring cloudiness even with good cleaning, you likely need periodic descaling on a set schedule, such as every few weeks, depending on hardness and usage. Using filtered or lower-mineral water can reduce how quickly scale forms. The key is to treat scale as a maintenance problem, not as a scrubbing problem.
How do I know if the issue is washing or drying?
You can tell by timing: if the bottle smells bad right after the cycle ends, the issue is usually washing coverage, disassembly, or detergent performance. If it smells fine at first but turns sour after sitting assembled or capped, the issue is usually drying or damp storage. Another clue is location: if only nipples or valves smell, you are likely trapping moisture in silicone folds. Run a test by washing, then leaving parts fully separated to dry in open air for several hours. If the smell disappears, your washer is probably fine, and your drying and storage steps need tightening.
Do I still need to scrub if I use an all-in-one bottle washer?
In most day-to-day use, you should not need routine scrubbing if you disassemble properly, load for spray access, and use the correct detergent dose. Scrubbing usually becomes necessary when milk has dried on, when a valve was not separated, or when parts were stacked and blocked the jets. A bottle brush can still be useful as a recovery tool for stubborn film, not as your default workflow. If you find yourself brushing daily, treat that as feedback that your loading pattern or disassembly checklist is incomplete. The goal of an all-in-one bottle cleaning system is consistent residue removal without manual labor.

